How to clean car interior: This illustrated checklist gives you all you need to clean you vehicle’s interior hustle free.
How to clean car interior: Vacuuming
 Remove the floor mats. Vacuum the seats and the carpet. Using the proper attachment, reach under the seats, around the pedals and the area between the front seats and the center console. Vacuum floor mats separately. Remove the floor mats. Vacuum the seats and the carpet. Using the proper attachment, reach under the seats, around the pedals and the area between the front seats and the center console. Vacuum floor mats separately. |
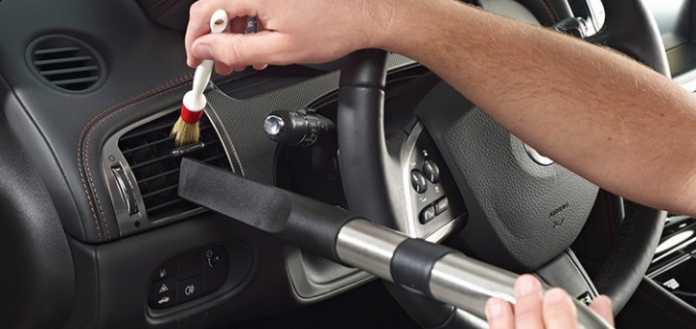
 Use a soft brush attachment to vacuum the dashboard, center console and the doors. Be careful not to damage knobs, vents and sticking parts. Use the same attachment vacuuming the seats. Leather seats are very easy to damage, be careful no to scratch them with the vacuum hose. Use a soft brush attachment to vacuum the dashboard, center console and the doors. Be careful not to damage knobs, vents and sticking parts. Use the same attachment vacuuming the seats. Leather seats are very easy to damage, be careful no to scratch them with the vacuum hose. |
How to clean car interior: Cleaning fabric seats and door upholstery
 Let’s see how we can clean this dirty spot on the rear seat. Let’s see how we can clean this dirty spot on the rear seat. |
 There are number of upholstery cleaning agents available. Here I used the Turtle Wax upholstery cleaner, but other products can work as well. There are number of upholstery cleaning agents available. Here I used the Turtle Wax upholstery cleaner, but other products can work as well.The first step, spray the cleaner evenly on the upholstery. |
 Rub vigorously. Once the dirty spot is gone, wipe it thoroughly with a dry soft cloth. Rub vigorously. Once the dirty spot is gone, wipe it thoroughly with a dry soft cloth. |
 The dirty spot is gone. You can clean all the seats and door upholstery the same way, working one area at the time. If you don’t have a special upholstery cleaner, a regular laundry detergent will work as well: Mix a small amount of the detergent with warm water. Dip a clean cloth into it. Squeeze out well – you want a barely moist cloth. Work harder on dirty areas. When finished, wipe out well with a clean, soft dry cloth. The dirty spot is gone. You can clean all the seats and door upholstery the same way, working one area at the time. If you don’t have a special upholstery cleaner, a regular laundry detergent will work as well: Mix a small amount of the detergent with warm water. Dip a clean cloth into it. Squeeze out well – you want a barely moist cloth. Work harder on dirty areas. When finished, wipe out well with a clean, soft dry cloth. |
How to clean car interior: Cleaning car leather
A car leather is very delicate, so it’s best to use a good product specially formulated for cleaning leather seats. Some leather care products make the leather more shiny or slippery. Other products can make it sticky or tacky, so before using it, test a product in a small area to see if you like it. Don’t use paper towels on leather, they can leave scratches; use a soft clean cotton towel instead.
 Be careful with the leather-wrapped steering wheel and shifter knob as some of the leather care products can make them slippery or sticky. I personally don’t use any products on my steering wheel and a shifter knob, I just clean them with clean and barely moist cotton towel. If you use any leather care products on your steering wheel, make sure that it is not slippery before you drive. Be careful with the leather-wrapped steering wheel and shifter knob as some of the leather care products can make them slippery or sticky. I personally don’t use any products on my steering wheel and a shifter knob, I just clean them with clean and barely moist cotton towel. If you use any leather care products on your steering wheel, make sure that it is not slippery before you drive. |
 Vacuum leather seat crevices with the soft brush attachment – be careful, as the vacuum hose can easily scratch the leather. Vacuum leather seat crevices with the soft brush attachment – be careful, as the vacuum hose can easily scratch the leather. |
 Spray some leather cleaner agent on the soft clean cotton towel. Spray some leather cleaner agent on the soft clean cotton towel. |
 Wipe the seat gently, reaching into crevices and around the edges. Wipe the seat gently, reaching into crevices and around the edges.Here I used a two-in-one leather cleaner/conditioner. If you have just a cleaner, apply a conditioner later to protect the leather. |
How to clean car interior: Cleaning the carpet
 You can clean the carpet the same way you cleaned the fabric seats and upholstery. The laundry detergent solution will work on the carpet as well. You can clean the carpet the same way you cleaned the fabric seats and upholstery. The laundry detergent solution will work on the carpet as well. |
 Work on one area at the time. Spray the carpet cleaner evenly. Work on one area at the time. Spray the carpet cleaner evenly. |
 Rub well. If your cleaner has a brush on it, you can use it on really dirty areas. Rub well. If your cleaner has a brush on it, you can use it on really dirty areas. |
 When done, wipe it thoroughly with a dry cloth. When done, wipe it thoroughly with a dry cloth. |
 Again, don’t soak the carpet with water too much, it will cause mould smell and corrosion under the carpet. Dry it out as fast as you can. Again, don’t soak the carpet with water too much, it will cause mould smell and corrosion under the carpet. Dry it out as fast as you can. |
How to clean car interior: Cleaning and polishing the dashboard and interior plastic
 Clean the dashboard, center console and other plastic parts with a barely moist clean cloth. Use a very small amount of laundry detergent to remove the stains. Dry with a clean soft dry cloth. To make it shiny, use a polish for plastic. Clean the dashboard, center console and other plastic parts with a barely moist clean cloth. Use a very small amount of laundry detergent to remove the stains. Dry with a clean soft dry cloth. To make it shiny, use a polish for plastic. |
 Spray a little amount of polish. Spread it evenly with a soft brush. Don’t spray directly on the stereo, or other electrical parts, use a brush instead. Spray a little amount of polish. Spread it evenly with a soft brush. Don’t spray directly on the stereo, or other electrical parts, use a brush instead. |
 Buff gently with a clean soft dry cloth. Buff gently with a clean soft dry cloth. |
 This is how it looked before and after polishing. If you prefer the dashboard and the plastic looking less shiny and more natural, there is a number of products that can do that. For example, I like the Meguiar’s Natural Shine that makes the plastic look more natural. This is how it looked before and after polishing. If you prefer the dashboard and the plastic looking less shiny and more natural, there is a number of products that can do that. For example, I like the Meguiar’s Natural Shine that makes the plastic look more natural. |
 A good polish not only makes the dashboard look clean and shiny, it shields and protects the plastic. All you need to do after, just use a soft duster periodically and your dashboard will look like new for a long time. A good polish not only makes the dashboard look clean and shiny, it shields and protects the plastic. All you need to do after, just use a soft duster periodically and your dashboard will look like new for a long time. |
Cleaning the windows
 Lastly, clean all the windows from the outside and inside. A window-cleaning spray and glass-cleaning towel will do a good job. Be careful when cleaning the rear window from the inside – the heating lines of the defogger grid are easy to damage. Use parallel to defogger lines motion. Lastly, clean all the windows from the outside and inside. A window-cleaning spray and glass-cleaning towel will do a good job. Be careful when cleaning the rear window from the inside – the heating lines of the defogger grid are easy to damage. Use parallel to defogger lines motion. |
How to get rid of musty smell from the air conditioner
 If you experience that unpleasant musty smell from the vents when the air conditioner is turned on, you can try one of the odor treatment that you can buy in your local auto parts store. It kills the bacteria and removes the mildew smell. Here we used the Air Conditioner Treatment from Wynn’s that you simply spray into outside air intake vent (check the directions on the product). If you experience that unpleasant musty smell from the vents when the air conditioner is turned on, you can try one of the odor treatment that you can buy in your local auto parts store. It kills the bacteria and removes the mildew smell. Here we used the Air Conditioner Treatment from Wynn’s that you simply spray into outside air intake vent (check the directions on the product). |
 A clogged air conditioner drain tube and accumulation of leaves and other debris under the cowl panel also may cause a damp mildew smell. Clean the debris and ask the mechanic to check the air conditioner drain tube when you do your next oil change. The drain tube is usually located under the car on a passenger side, near the firewall. A clogged air conditioner drain tube and accumulation of leaves and other debris under the cowl panel also may cause a damp mildew smell. Clean the debris and ask the mechanic to check the air conditioner drain tube when you do your next oil change. The drain tube is usually located under the car on a passenger side, near the firewall. |
READ MORE: Top 10 most expensive presidential cars in the world


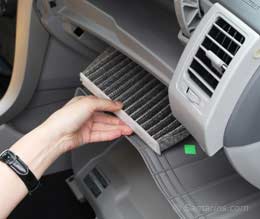

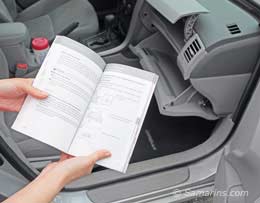 In this car, Toyota made it very simple and provided the instructions in the owner’s manual; it is a fairly easy task.
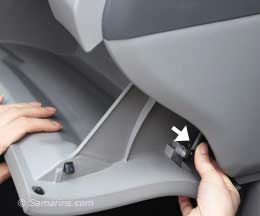
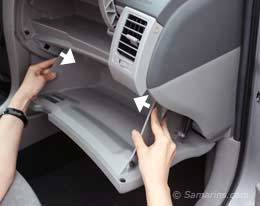 Now, the manual says push in each side of the glove box to disconnect the claws. What it means is there are two claws sticking out on each side (see the next photo); to pass them out of the glove box opening, you need to squeeze the glove box gently from each side.
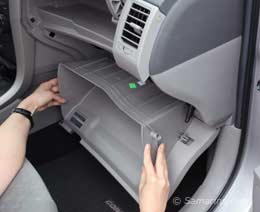 Here you can see the claws we are talking about.
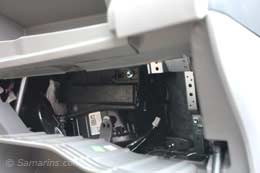
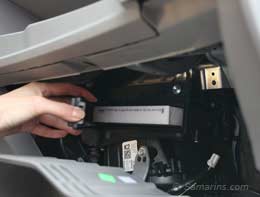
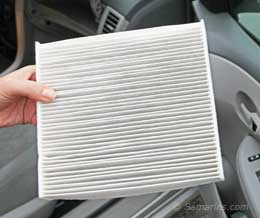 Here is the new cabin air filter we bought from a Toyota dealer.
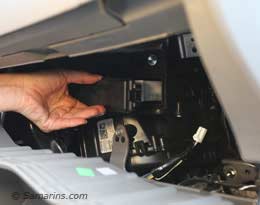 All we need now, is to install everything back in the reverse order. Make sure install the filter the right way. This manual says The “↑UP” marks shown on the filter should be pointing up. Slide the filter back carefully; check if the cover closes properly.
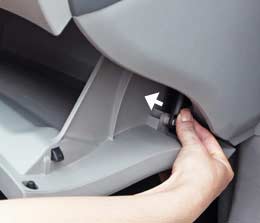 Lastly, push the damper back into its place. Done.


