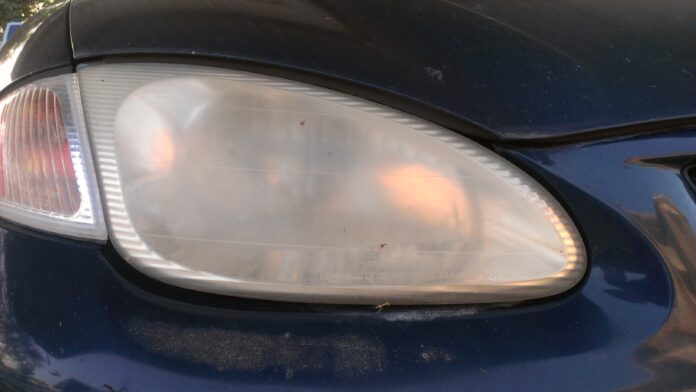
Almost all car headlight lenses made within the last few decades are made of poly-carbonate plastic, which is a clear, hard polymer that gained popularity for allowing manufacturers great design flexibility. Basically, you can make your headlight assemblies into any shape you would like.
Unfortunately, poly-carbonate, like most plastics, degrade over time and eventually become foggy. This is an obvious safety hazard considering that your headlight’s light output is absorbed by the cloudy lenses, causing vision at night to be degraded. Here are reasons why your headlights are cloudy and how to fix them.
Reasons behind it
The major reason why polycarbonate lenses on the get cloudy is due to their interaction with the sun’s ultra-violet (UV) radiation. Exposure to exhaust, salt, grime, oil and acid rain are several other facts that contribute to lens degradation, but UV light is the biggest culprit.
This has to do with the fact that the energy of UV radiation is close to the “disassociation energy” of the chemical bonds in the plastic, so over time, the plastic lenses start to chemically dissolve and become foggy over time.
Restoring Headlamp Lenses
The good news is that your lenses aren’t foggy all the way through, with only its outside layers being susceptible. That means, with the right materials and equipment, you can polish off the outer layer and restore the lenses to almost new condition. Here are three methods that should enable you to restore headlamp lenses to like-new condition:
Using all-in-one cleaner
Using an all-in-one is the least aggressive method of restoration. Some of these cleaners consist of only a solvent, while others contain a solvent with a mild abrasive.
These products are all applied in a similar way, typically requiring you to apply a small amount of product to a foam applicator and then working the product until a fresh, clean plastic surface appears.
Using a plastic polish
If using an All-in-one doesn’t deliver the desired results, a dedicated plastic polish might do the job. Most dedicated plastic polish contain ultra-fine abrasives that work to remove the top film-like layer of your lens to reveal the clear plastic below. Using such products is quite straightforward and can be done by hand or with an orbital buffer.
Wet sanding and polishing
This is the most aggressive method you can use. If wet sanding and polishing doesn’t work, then the car’s headlamp assembly will probably have to be replaced. You will need some fine dry sandpaper. Fill a bucket with some water and soak the sandpaper in the bucket for about 15 minutes prior to starting.
Take the sandpaper and sand the lens, side-to-side, applying light to medium pressure. After this, take another sandpaper and sand the lens top-to-bottom, applying light to medium pressure. The lens will appear to clear up a little.
Finally, don’t attempt to polish the lens by hand. Start with the more aggressive polish combination and polish the lens thoroughly. Once done polishing, assess progress by wiping with a towel. Chances are you will have to polish a second time. Once you are done, move on to the less aggressive polish combination. It may take some time but your lens will likely polish to a nice, clear finish.


