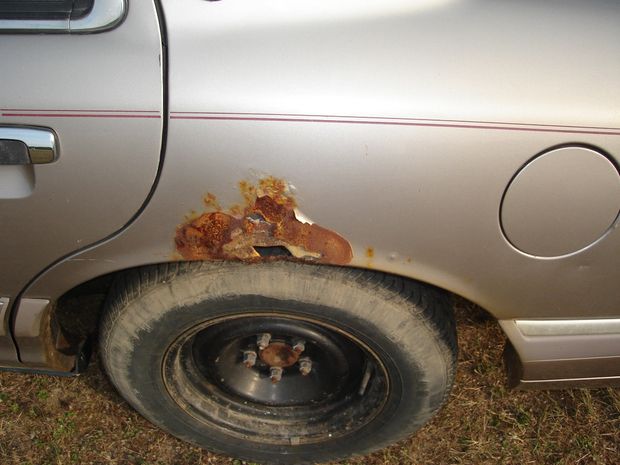
A troublesome rust spot on a car typically spreads with time as the metal underneath is exposed to moisture and air, which cause it to oxidize, or corrode. Whether you plan on keeping it or selling it, your car will look cleaner (and be worth more) without the rust, so don’t hesitate to take immediate action. Remove the rust spots and give the car fresh coat of paint as early as possible to stop widespread rust damage before the spot has a chance to spread.
Take basic safety precautions. This method involves using a sander and a grinder — two powerful electric tools that can kick fine rust and paint dust into the air. To avoid injury and protect yourself from these airborne particles, be sure to wear gloves, safety glasses and especially a dust mask to keep the rust and paint particles out of your lungs.
For heavy-duty jobs, consider using a respirator rather than a simple dust mask.
Mask any spots that you don’t want to get dusty. This job puts rust and paint particles in the air. If you’re not careful, these can settle on your car, giving it a “dirty” appearance that can be hard to get off. To avoid this, “mask” the parts of your car that you’re not working on (that is, cover them with tape and masking paper.) Use a tarp sealed with painter’s tape under the car to define your work area and protect the floor.
Masking the car off is a delicate art. Do not use newspaper, as paint spray can leak through it and leave unsightly specks. Instead, use real masking paper, which is less porous and won’t let paint through. Also, be sure to tape every single edge of your masking paper down. Don’t just use a few small pieces of tape to get it to stay in place — paint can (and will) work its way under any loose edges.
Grind rust down to “fresh steel.” This method is slightly different than the one above, but works by the same basic principles and should work especially well for rust spots that have caused holes or pitting. To start, use a metal grinder to remove all of the rust. You want to grind to the point where you have “fresh” (un-rusted) steel all around where the rust spot was, even if this leaves you with a hole.
Getting rid of all of the rust is crucial — if you miss even a small fleck of rust, it can corrode underneath your car’s paint over time and lead to another rust spot.
Keep in mind, that, because you’re using a grinder, all of the safety precautions at the beginning of the page apply for this method as well. That means wearing gloves, safety glasses and especially a dust mask to keep the rust and paint particles out of your lungs.
Cover the hole with a non-rusting filler. Next, you’ll want to apply a filler over your former rust spot. You can buy commercial fillers at most auto stores for fairly cheap prices. For larger holes, however, you may need to improvise. In this case, you need something flat and fairly durable that paint can bind to and that won’t rust to patch the hole with. Fix this object in place with a coat of commercial filler and allow it to dry.
Believe it or not, cut-up beer or soda cans work well for hole-patching purposes. The aluminum in these cans is naturally corrosion-resistant and many modern cans are coated with a thin protective layer anyway. Another good choice is thin sheets of hard plastic.
Use sandpaper to level. Next, use sandpaper to create a smooth, even surface between your new “patch” and the actual body of the car. This can be a long, tedious process — as you sand, you’ll probably find that you need to add additional filler and let it dry periodically as you sand away the existing filler. The process thus becomes something along these lines: Filler, grind, filler, grind, filler, grind… (and so on).
Start grinding with a rough (low grit) sandpaper to smooth out big bumps, then gradually transition to a medium and finally a fine (high grit) sandpaper for a perfectly smooth finish.
Slow, steady, hand-sanding is best for this process — mechanical grinders can tear your patch away.
Mask around your work area. Next, you need to apply a fresh coating to your newly-repaired rust spot. To prepare for this, you’ll need to mask most of your car to protect it from primer paint, and other airborne particles. Don’t forget your windows and tires.
Try to have the edges of your masking aligned with existing seams in the body of the car to hide minor differences between your new paint and the old paint (unless you’re experienced enough to produce a smooth blend).
Apply primer, then paint. Apply a few thin coats of primer, allowing each coat a minute or two to adhere before you reapply on top of it. Let the primer dry overnight, then, after about 12 hours, give it a sanding with wet 400 grit sandpaper so that the paint can adhere properly. When you’re ready, apply your paint on top, using a similar “spray one thin coat at a time and let it dry” strategy as you used for the primer.
You may want to buff out the edges of your paint and/or cover with a clear coat layer so that this section matches the finish on the rest of your car.
Obviously, it’s important to pick a paint that matches your car’s current finish. There is a specific paint color code for each vehicle that can be found on a sticker somewhere in the vehicle. This information is needed in order to match the color up. Most auto paint shops will be more than happy to help you with this. Keep in mind, however, that the paint on older cars can gradually discolor over time.


